


Here is the board of all the ideas I used and some I didn't. Enjoy!


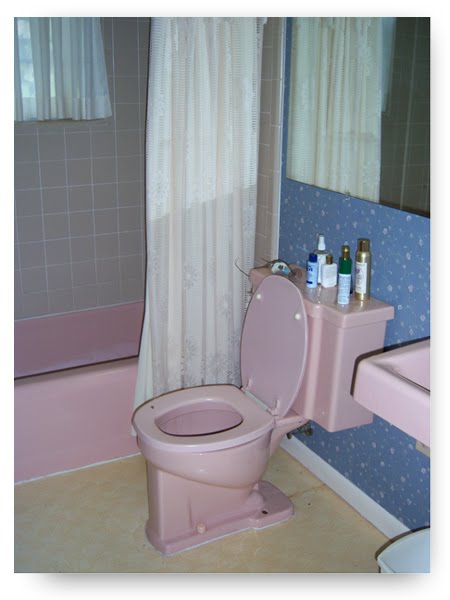 Our bathroom was complete with pink toilet, pink tub, and pink wall mounted sink that was enhanced by the exposed plumbing underneath. We were also blessed with yellowish linoleum flooring and again floor to ceiling wallpaper which was blue with pink flowers. When I decided that I would start to tackle this bathroom, I thought to myself, "I wonder how hard it is going to be to take down that wallpaper." So, as I was thinking this, I snuk to the bathroom, and grabbed a piece and yanked it. The entire piece came off in one pull, and I had the bathroom wallpaper free in 30 minutes. That really got me rolling, and this is the final product.
 We got rid of all the pink, and replaced the toilet and added a black vanity with white marble top and brushed nickel accents. We added porcelain tile floors and painted the walls. We added a new vanity light fixture, but by compromise only did the large mirror stay. I am thinking about framing it out with a ledge like a window, painted out black. I love it. It feels spa-like, yet it could be changed with a new shower curtain and accents to be a kid's bathroom, which it is getting closer to being since I am so close to having the house the way I want it. :)


 Complete with my favorite color GREEN, walls, black cabinets, bead board back splash, freshly tiled ceramic floors, and brand new stainless steel appliances. Our countertops look more in style now with the black contrast. I even watched a show on HGTV the other day that said that these type countertops were back in style. My budget and design are happy. :)
 Shall I reveal our living area, our master bath, or our guest bath next week? Hmm... I have a decision to make.


 Here is the beaded board and the paint color. I got a few pieces in before bed.
 My lovely house. The house has a lot of additions, but the bathrooms were so out of date. So this is the bathroom before. That is not before I started removing the yucky wall paper. Not only did it have wallpaper, but it had nasty carpet.
  So we gutted it. Out with everything. We got rid of the sink and toilet, but moved the tub to the bedroom for the time being.
 Now to the part that has been taking so long, the tile. Love it! Hate the process. This picture is of the hallway, we are tiling it as well. So it is taking longer than i would have hoped, but a few more days and I will be able to get the wainscoting, trim, and paint on the walls. I promise to keep you as up-to-date as possible.

